Wouldn’t you like to make a beret different from the classic hats and look good? This free written pattern is just for you, It’s designed and produced by Sirin’s Crochet. And you can find the video tutorial below.

Materials: Size 3 yarn – 290 mt, 4.00mm hook, Tapestry needle
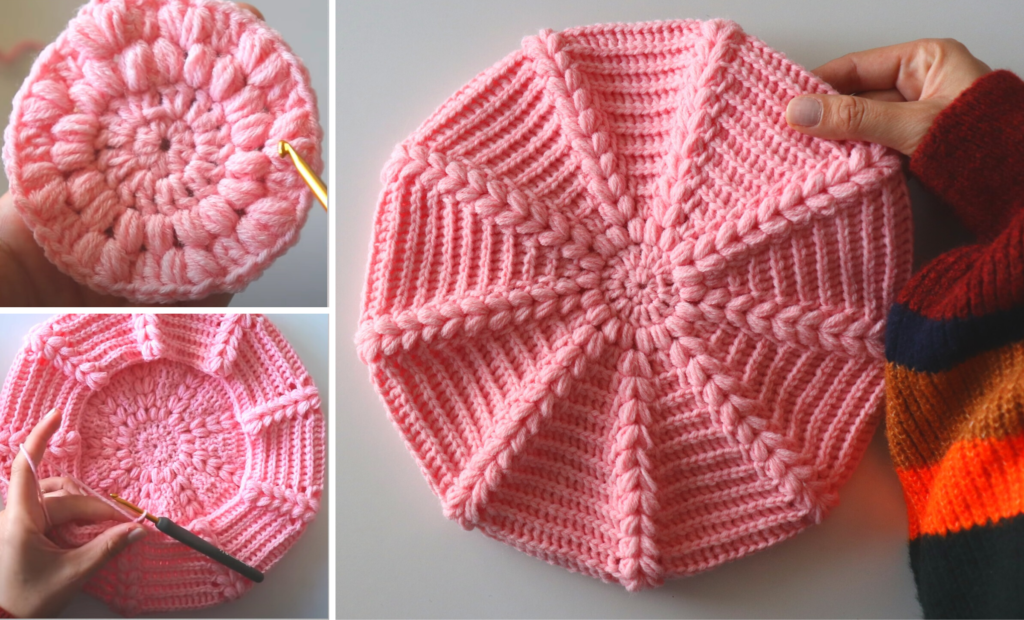
Stitches used: Chain: ch =>Half double crochet:hdc =>Double crochet:dc =>Back post double crochet: bpsc =>Front post double crochet:fpdc =>Stitch: st

Notes When you see ( )* it means you repeat the instructions in between ( )* Where you see the word turn it means to turn your work clockwise and work back down the row.
Make a Magic Ring and make 9 hdc in it.

Row 1: Ch2 and not count. Make 2 dc in every st. (total 18dc)
Row 2: Ch1+pull up a yarn 3 times and pull through together and ch1 so you have a puff st+and make a puff st in the same st. Then make a 2 puff st in every st. (total 18 puff st)
Row 3: Ch1+*(2 puff st+2dc)**

Row 4: Sl st to the between of the puff stitches+ch1+*(2 puff st+make a dc in the middle of the puff st and dc of previous row+2 bpdc in the 2 dc’s st of the previous row+make a dc in the middle of the puff st and dc of the previous row)**so make increasing
Row 5: Sl st to the between of the puff stitches+ch1+*(2 puff st+make a dc in the middle of the puff st and dc of the previous row+4 bpdc+make a dc in the middle of the puff st and dc of the previous row)**so make increasing
Row 6: Sl st to the between of the puff stitches+ch1+*(2 puff st+make a dc in the middle of the puff st and dc of the previous row+6 bpdc+make a dc in the middle of the puff st and dc of the previous row)**so make increasing

Increase like that, until radius to 4 inches.
Row 11: Sl st to the between of the puff stitches+ch1+(2 puff st+14 bpdc)*
Row 12: Sl st to the between of the puff stitches+ch1+(2 puff st+14 bpdc)*
Row 13: Sl st to the between of the puff stitches+ch1+(2 puff st+14 bpdc)*
Row 14: Sl st to the between of the puff stitches+ch1+(2 puff st+skip 1st+12 bpdc+skip 1st)*
Row 15: Sl st to the between of the puff stitches+ch1+(2 puff st+skip 1st+10 bpdc+skip 1st)*
Row 16: Sl st to the between of the puff stitches+ch1+(2 puff st+skip 1st+8 bpdc+skip 1st)*
Row 17: Sl st to the between of the puff stitches+ch1+(2 puff st+skip 1st+8 bpdc+skip 1st)*
Row 18: Sl st to the between of the puff stitches+ch1+(2 puff st+skip 1st+8 bpdc+skip 1st)*
Row 19: Sl st to the between of the puff stitches+ch1+(2 puff st+skip 1st+8 bpdc+skip 1st)*
Row 20: Sl st to the between of the puff stitches+ch1+(2 puff st+skip 1st+8 dc+skip 1st)*
Row 21: Ch2+(2 fpdc in the 2puff st of previous row+2 bpdc)*

Its important thing is after that row, you must have multiples of 4 st.
Row 22: Ch2 and not count. (2fpdc+2bpdc)*
Row 23: Ch2 and not count. (2fpdc+2bpdc)*
Row 24: Ch2 and not count. (2fpdc+2bpdc)*
Row 25: Ch2 and not count. (2fpdc+2bpdc)*

Video tutorial
I hope that you have enjoyed this pattern! I love to see what everyone makes using inspiration from my blog! If like me you’re always looking for patterns, Well I am here to take the frustration out of searching for your next pattern. The crochet community has grown last few years and many designers are setting up their own websites and hosting their own patterns. I like to find and show you these independent designers and bring their fabulous projects to you. Please always visit and thank the individual designers for their generosity.


